Table of Contents
Conditioning Chamber for Cognitive Experiments
~~META: status = finished &relation firstimage = :project:ratbox.jpg ~~
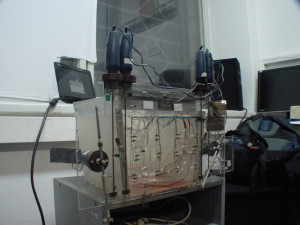
One of our guest speakers in 2010 was Phd. Tereza Nekovarova, who works at the Laboratory of Neurophysiology of Memory, Institute of Physiology, Academy of Sciences of the Czech Republic. She asked us to repair the operant conditioning chamber for experiments regarding spatial cognitive abilities of rats.
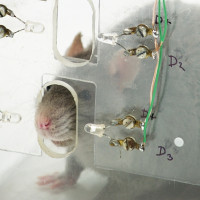
The device is essentially a more complicated version of the classic Skinner box. The rat has six slots available to choose from based on external visual stimuli - it has to insert its nose in the slot, triggering a photobeam detector in front of the slot. If it makes a correct choice, it gets rewarded by sweet liquid from one of the two dispensers located on each side. If the rat makes a wrong choice, the slots are closed by a sliding door.
Photo documentation is available here
We presented and passed the chamber to the Academy of Sciences (see)
Status
Both the chamber, the firmware and the experiment control software is done and ready for use!
All source codes are available in a GitHub repository:
Physical Construction
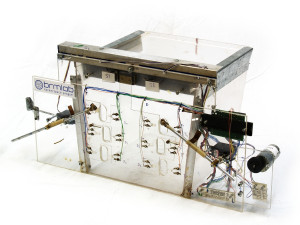
The device consists of a semi-translucent plastic box (29cm x 24cm x 29cm) for the rat and a front plexiglass panel with the slots, mounted motors and electronics and a sliding door (thinner sheet of plexiglass) on the inside of the front panel.
Sensors
Six slots (2cm x 3.5cm ellipses) (three rows in two columns) are positioned in the middle of the front panel. Each slot is equipped with an IR LED on one side and a photobeam detector (photodiode) on the opposite side - when the rat inserts its nose in the slot, the IR beam is interrupted.
Feeding Dispensers
Two feeding dispensers on long arms are mounted on the sides of the front panel and moved using step motors - their arc covers three holes of their respective column. Each of the feeders has four defined positions corresponding to the three holes and a “zero” position below the panel (so that the rat cannot see the feeder when not in use).
The dispensers are tiny glass containers refilled from a reservoir in the zero position.
Door Mechanism
The sliding door is mounted on the inside of the front panel. The door is shaped so that it covers the slots in the close position but does not obstruct the way in the open position.
It is held in place by two screws sliding in grooves made in the front panel. The door is pulled open by a motor on the right side and pulled close by a spring on the left side when the motor is turning in the opposite direction. The fully closed and open positions are detected by switches on the top of the panel; a relay circuit causes the motor to switch directions based on the door position.
Wiring and Electronics
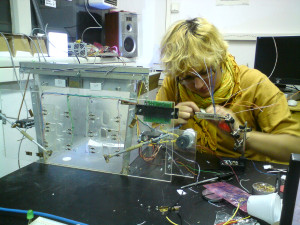
The electronic parts of the chamber are positioned mostly on the right side of the front panel. Their task is to detect slot usage and control the feeder and door motors. The central control point is the Brmduino board equipped with an ATMega328 microcontroller. The firmware accepts commands and reports status over USB. All the electronics is powered just by the USB port, no external power source is necessary.
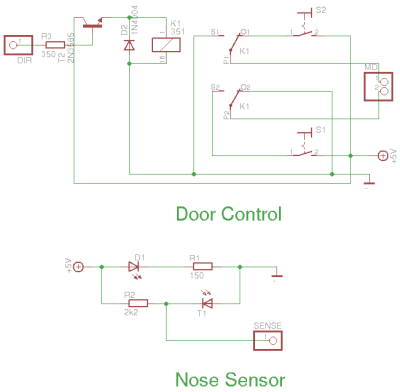
The figure below describes the slot sensor and door control relay circuit. (Note that the physical layout of the components is different, this describes just the electrical circuit.)
Slot Sensors
Each sensor circuit (labeled “Nose Sensor” on the diagram) is composed by an LED-photodiode pair. All diodes in a column share the same cathode and have a separate anode (though the LEDs are turned on continuously). The wires connect the diode pairs in the slot area to a dispatch board in the electronics area.
The dispatch board has two purposes. First, it completes the slot sensor circuits. Each slot sensor occupies two adjacent columns on the dispatch board; the LED column is equipped just with a current limiting resistor to the ground. The photodiode column also contains a current limiting resistor, but extra lead is connected between the photodiode and the resistor; if the photodiode receives IR light, it passes current and grounds the lead to logical 0; if no light is received, the photodiode does not pass current and the lead is pulled up to logical 1 by the resistor. The leads are connected to the Brmduino, allowing to detect individual status of each slot.
The second purpose of the dispatch board is to distribute power supply to all the motor circuits.
Feeder Motors
The feeder servo motors are connected using three wires. The +/- power supply wires are connected to the dispatch board. The yellow control wire is connected directly to the Brmduino board and can be used to specify the exact angle of the feeder arm.
We use two motors of the type HS-311 - a step motor used in RC models - for moving the two sweet liquid dispensers. It is very accurate and easy to use. It has pulse control and uses only around 170mA - this makes it possible for the whole device to function without an additional power source.
Door Motor
The door motor is the most elaborate circuit. The door position is controlled using a single lead connected to the Brmduino: if the lead is logical 1, the door is open, if it is logical 0, the door is closed. The lead controls a relay that switches the motor between opposing polarities (i.e. movement directions), while the connection of each polarity is broken by the respective door switch.
Therefore, if the lead is set to logical 1, the motor is set to the “opening direction” polarity and starts turning until the moving door presses the open switch, which interrupts the circuit and the motor loses power. If the lead changes to logical 0, the relay switches the motor to the “closing direction” polarity and the motor starts turning in the reverse direction until the door presses the close switch.
Brmduino
The Brmduino board is a clone of the popular Arduino board. It is essentially just a break-out board for the ATMega328 microcontroller. The firmware periodically checks the pins connected to sensor leads and reports their status on USB serial, and listens to incoming USB serial commands and sends signals to the motors accordingly. The Brmduino board also provides +5V power to the rest.
Software Interface
The chamber, when connected over USB, provides a USB serial interface with very simple protocol. The interface can be used to get a continuous information about slot status, to control the door status and to move the feeding dispensers. Writing custom experiment control software should be reasonably easy.
We have also written an experiment control software for the Czech Academy of Sciences, using GAMBAS as the programming platform and providing a graphic interface representing the flow of the experiment.
Both the firmware and the software is available for download in the GitHub repository http://github.com/brmlab/ratbox
(The documentation for the control software below is a little outdated. However, it is still useful for understanding the basic operation and configuration principles.)
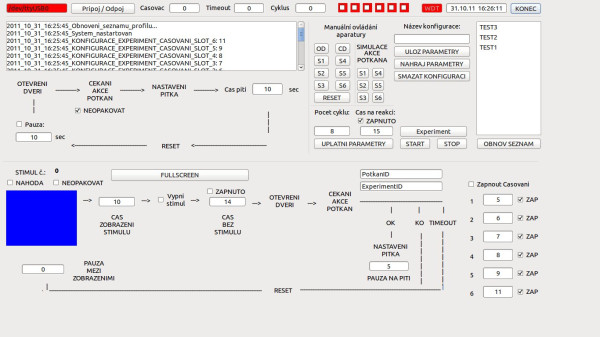
The control software offers easy set-up of various experiment workflows. The user interface may seem a bit complicated at first, but it offers high flexibility and the visual organization of the control widgets represents the actual experiment flow.
The experiment is run in two phases:
- Pretraining: This is the default mode, controlled by the top half of the screen. It serves to train the subject to use the slots and learn that reward may come from this activity. Every time any slot is filled the rat is rewarded.
- Visual Experiment: The actual experiment. Pre-defined visual stimuli are shown to the rat and its reaction is monitored, a reward is provided only when the correct slot is chosen.
Experiment Operation
When the box is connected to the PC, it needs to be connected to the application using the “Pripoj BOX” button. If the box is connected successfully, the red background for the port name changes to green. It is possible to use the software without the box connected as well - this is useful for planning of experiments.
When the box is connected, status of all six slots is always shown at the top of the screen; you can put a finger in one of the slots to check that everything works well. Manual control is also possible; the “OD” and “CD” buttons open/close door manually and “RB” can be used to reset the whole aparature - it closes the door and moves the dispensers to the base position. The S1 to S6 buttons nearby can be used for manual dispenser control.
Regardless of the mode, the experiment is performed in several cycles and started using the START button. The experiment may be stopped early using the STOP button (however, it will stop only after the current cycle finishes.) All the controls can be changed real-time during the experiment. Detailed logs of all events are shown and saved to RatBox.log in the program directory.
Pretraining
This is the default mode, controlled by the top half of the screen. Start it by just pressing the START button. The current phase of the cycle is highlighted in green. The cycle starts with door opening and then awaits the rat action. Slot usage may be also simulated using the six buttons S1 to S6. Then, a dispenser is moved to the slot position, remains in place for given time period and then the dispenser returns to the base position and the door closes again. A pause between the cycles may be specified.
The training may be tweaked using the controls above the cycle. P1 to P6 checkboxes may be used to disable some of the slots (e.g. if the rat keeps using only some of the slots); check “NEOPAKOVAT” if one slot is not to be served twice in a row.
Visual Experiment
This mode is enabled by checking the “VISUALNI STIMUL” checkbox. The experiment cycle is shown in the bottom half of the screen. A set of six visual stimuli is shown to the subject, each stimuli is associated with a single slot. Single cycle of the experiment corresponds to one stimulus.
The visual stimuli are stored as BMP files 1.bmp to 6.bmp in the home directory. In the default mode, the stimuli are shown in raising order (1 to 6 and then again from 1). Check 'NAHODA' to randomize the stimuli order, check 'NEOPAKOVAT' to prevent repetitions when using the randomized order. The number of the current stimulus is shown next to the 'VISUALNI STIMUL' label.
Define the time for which the stimulus is just shown using 'CAS ZOBRAZENI STIMULU'. By default, the stimulus is shown throughout the whole cycle, but you can hide the stimulus at this point using the 'Vypni stimul' checkbox. In that case, you can also enable a blank period using the 'CAS BEZ STIMULU' field.
Afterwards, the door is open and the subject has some time ('CAS NA REAKCI') to choose a slot. Again, a slot choice may be simulated using the S1 to S6 buttons. In case of timely correct choice, the dispenser is set and left in position for some time ('NASTAVENI PITKA'). Then, the dispenser is reset, the door is closed. Again, a pause between the cycles may be specified.
The behavior of individual stimuli can be customized using the rightmost controls. You can turn each stimulus on/off using the ZAP checkbox, or define individual 'CAS ZOBRAZENI STIMULU' values for different stimuli if you check 'Zapnout Casovani' and then modify the numeric values in that row.
History
We have not created the chamber from scratch - originally, we have received an earlier version (the author is unknown to us) for repairs. After inspecting it and trying to reverse-engineer the circuits, we have decided to modernize and simplify both the mechanical and electronic parts. We have kept the original mechanical casing and the sliding door construction, but replaced the feeding dispenser motors and remade all the electronic circuits.
We removed the four top motors (extracted probably from acu-drills) that determined the dispenser position and replaced them by servo motors - both the mechanics and the electrical control is simplified. The original setup was controlled through a serial port and a series of complicated electronic parts which we discarded in favor of a Brmduino. We have made a new board for the door control, but reused a relay from the original circuit and re-used the same principle.
